Tiqr library integration guide - login
Note: if your application uses simpleSAMLphp as its authentication library, you may want to download the authTiqr plugin for simpleSAMLphp, which is a completely pre-integrated, out of the box tiqr setup. All it requires is some configuration. Also, if your application is based on Zend Framework, download the zfTiqr package, which is an example integration of Tiqr into a Zend Framework application. For all other integrations, read on.
We’ll start with the login process. The next post will cover enrollment. Before you start to integrate tiqr in your own application, we recommend you familiarize yourself with the concepts, for example by using the demo environment to see how tiqr works.
Tiqr is a library that is intended to be integrated into applications. The library has interactions that involve both the user’s browser and the user’s phone, but it will never do so directly. It will use your application as a wrapper. This allows you to customize everything that tiqr does, and it allows the tiqr library itself to remain independent of implementation details.
The following diagram explains the complete integration. We’ll go through each of the integration points to help you understand what goes on where.
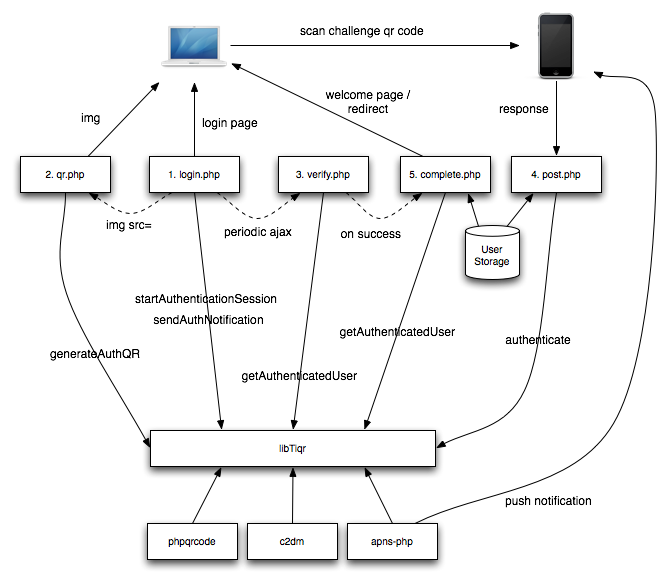
There are 5 ‘entrypoints’, the elements in the diagram with a .php extension. (You may choose to use a single php file or for example a framework MVC setup to accomplish the same, but for the sake of clarity we’re going to assume separate files in this guide).
Note that all scripts communicate with the tiqr library through the Tiqr_Service class. The class has extensive documentation, see the class’s constructor for documentation on what configuration options you can pass to the class.
Let’s have a look at the scripts you have to create:
- Login.php
This is the page that a user will request to login to an application. It has a number of responsibilities.
First it starts an authentication session by calling startAuthenticationSession on the tiqr service object. This prepares the tiqr library for authentication.
Optional: In the case of step-up authentication (when using tiqr to confirm the identity of an already authenticated user) the script should also call sendAuthNotification, which sends a push notification to the phone of the user to request verification.
The page should include an tag with the output of qr.php, which we’ll cover later.
After showing the QR image it should trigger an ajax update loop which periodically calls verify.php, which is also covered further down in this article.
- Qr.php
This is a wrapper that generates a QR tag which is displayed in an tag on the login page. It calls the tiqr library’s generateAuthQR function to generate a QR code that contains an authentication challenge. The script should not have any other output than the actual QR image. generateAuthQR will directly send the QR code to the browser.
Under the hood the tiqr library uses phpqrcode to generate the QR code; when instantiating the Tiqr_Service object you pass the location of the phpqrcode library as part of the $options array.
- Verify.php
While the user is grabbing her phone to perform the authentication, your login page should periodically check if authentication has taken place yet. There are different ways to do this but the easiest way is to perform a periodical ajax call to a script that checks the login status. In the above diagram we have named this script verify.php. All it does is call getAuthenticatedUser on the tiqr service object to see if a login is available.
If no login has happened, we repeat the process. If a login has happened and a user is now authenticated, you should redirect to the complete.php script to finalize the authentication process.
We’ll cover complete.php later, let’s first look at what the user and her phone are doing in the meantime.
- Post.php
The user will have scanned the QR code by now, and will have entered her PIN code. Upon doing so, the phone generates a response to the QR challenge and will send this response, along with the user’s userid to your application. It posts it to Post.php.
Side note: the phone needs to know where to post the responses; in the enrollment process you specify the URL of your post endpoint. See the Enrollment Integration Guide how this is set up.
Post.php uses the input it receives to make a call to the tiqr library’s authenticate method. The authenticate method also needs the user’s shared secret, which you should retrieve from your user database and pass to the authenticate method.
The authenticate method will then return an authentication response, which could be ‘succesful’, ‘invalid response’ or any of the other tiqr response codes (see the documentation for the Tiqr_Service::authenticate method).
Post.php is responsible for outputting a response to the phone (unlike qr.php and login.php whose output ends up in the user’s browser, post.php is a file whose output is read and interpreted by the phone). What the script outputs should be based on the response code from the tiqr library. See the tiqr authentication protocol documentation on the exact strings that post.php should output. In general, you should simply output a string version of the tiqr library’s response constant. If Tiqr returns Tiqr_Service::AUTH_RESULT_INVALID_CHALLENGE, your script should echo “INVALID_CHALLENGE” (which in this case tells the phone that it scanned the wrong QR code). Make sure the result code is the only thing your script outputs, otherwise the phone gets confused.
If your application supports account blocking after unsuccesful login attempts, it should send an ‘attempts left’ as part of the response, so the phone can display a message to the user indicating she has only so many retries left. For example if tiqr returns AUTH_RESULT_INVALID_RESPONSE, you can send “INVALID_RESPONSE:3” to the phone to indicate there are 3 attempts left. If you block the account then you should output “INVALID_RESPONSE:0” which tells the phone the login was invalid and the account is now blocked on the server side.
Note that actually blocking the user and keeping track of login attempts is a responsibility of your application, not of the tiqr library. The reason for this is that the tiqr library is storage independent; it works with whatever you use to store your user accounts and does not want to impose any account-blocking policies.
- Complete.php
Once login has taken place and verify.php has noticed this, the user’s browser will be redirected to the complete.php script to finalize the login process. Whatever you do here is up to your application. Some applications will want to display a ‘you are now logged in’ page, other applications will want to redirect the user to an application page. Most of the time you will want to update your application’s session to indicate that a user is now logged in.
Whichever of these you choose, it is imperative that first you do another call to Tiqr_Service’s getAuthenticatedUser method, to ensure that the user is indeed logged in, and to retrieve the id of the logged in user. If you don’t do this, anybody could call complete.php manually and fake a login, so this is important!
If you create a welcome page, then you’d typically fetch the user’s profile information from your application’s user storage and display that to the user.